May 18, 2022

Paper Crafting Blog Hop - Slim Sayings Masculine Slimline Card

We have a great blog hop for you this month. Our April Paper Crafting Blog Hop theme is masculine (often the most neglected type of product). However, you will see there are so many fun projects and design styles from this group of talented Independent Stampin’ Up! Demonstrators from around the globe. Be sure to stop at each of our blogs to see each one! You may have arrived from Annette's blog. Did you love her project?


Slim Card Chevrons With a Masculine Twist

This month's blog theme gave me the perfect opportunity to create a card for my sweet and helpful husband. With our anniversary coming up, I decided to create a card that would show him how much I appreciate him. I decided to use the SLIM SAYINGS bundle with the chevron die in the SLIM CARD dies included in this bundle. And since he is a big nature lover, I brought in my PEACEFUL DEER stamp set which has some great pine trees. (You can use those Christmas themed stamp sets for more than just Christmas)! 

For my focal image: 

  • I created a ink blended background. First I taped off a masked border (be sure to use low tack tape or masking paper) on the Basic White cardstock and then used Pool Party ink and Blending Brush---concentrating more ink around the edges than the middle. 
  • I stamped my sentiment onto the blended background with Tuxedo Black Momento ink. 
  • For the pine trees I took 2 of the pine tree stamps and placed them next to each other on the clear block to stamp them together (one of the great benefits of photopolymer stamps). TIP: Stamp solid images using the Stampin' Pierce Mat to get the best stamped image results. 
  • Then I fussy cut the Evening Evergreen stamped pine trees using my Paper Snips Scissors. 
  • Lastly, I added some of the Classic Matte Dots in the Basic White color for a little extra embellishment. 

I am really enjoying the fun background that the SLIM CARD dies creates. I will be very sad when it retires with the Jan-June 2022 Stampin' Up! Annual Catalog. So if you like this look too, be sure to order it right away!


Here's some more samples using these great SLIM CARD dies. And they are so easy to put together when you use the Adhesive Sheets! I always cut the die in at least 2 different cardstock colors and then make 2 different cards with the pieces. (Look closely and you will notice that my sample for this Paper Crafting Blog Hop uses pieces left over from my "Hello" card shown below. I just changed the card base color from Basic White to Evening Evergreen for a very different look).


Want to see how to easy it is to piece together the elements from the SLIM CARD die cuts? Watch my YouTube video that was done "live" for the latest Global SU Share Fair Facebook group!


I really hope you have enjoyed my project. Post comments, or questions, in the comments section below. I love seeing your posts!

~ ~ ~ ~ ~ ~

Thanks for hopping with us this month. Now click on the "Next Blog" image to zoom to Tracy's blog to see another fantastic project!

Joy 🌷


P.S. Don't forget to leave your comments! (scroll down)

Here's the list of hoppers just in case you get off the trail... 🐇

Shirley Merker

Julia Mazur

Annette McMillan

Joy Nelson  YOU ARE HERE

Tracy Held

Terri Stewart

Julia Quinn

Krissi Hannahs


Product List 


If you don't already have a Stampin' Up! Demonstrator, I would love to be yours! 


Ready to order? Please use the April/May host code (or the current month host code in the right hand column). Use the direct link 
here.

If your order is $150 or more, be sure to delete my host code so that YOU get Stampin' Rewards (10% of your product subtotal in FREE items you choose). 

Contact me via my website if you have any questions. 


Want a discount on your Stampin' Up! paper crafting purchases? 

A commission based on your sales?

PLUS---now thru May 31st, 2022---get an additional $66.50 of new 2022-2024 In Color products added to your $125 of products of your choice.

ALL for ONLY $99 + tax.

WHAT A DEAL!!! Click here.

Contact me for more info.


  • Shop my ONLINE STORE
  • Join my Paper Poets Team – Discount Shoppers, Hobbyists, Part Time & Full Time Stampin' Up! demonstrators 
  • See my class schedule
  • Socialize with me on Facebook
  • Email Me
  • "Subscribe" via the box in the sidebar to the right (towards the top) so that you don't miss a single post! 


    Have a comment? Please leave it below. 😃  

    May 10, 2022

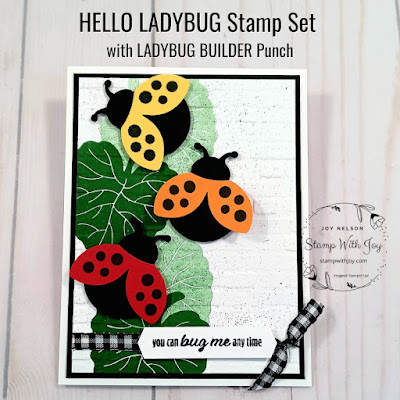
    Brick & Mortar Meets Hello Ladybug - Texture Blog Hop

     Texture, Texture, Texture!


    One of my absolute favorite techniques is texture! And what makes showing you this technique even better is that it is part of the Crafty Collaborations Technique Tuesday Texture Blog Hop. Be sure to visit all of the blog links listed below to see many more great examples using texture and get loads of inspiration, tips & tricks!


    Like I said texture is a favorite technique of mine. I love LOTS of texture on projects! 

    I started by stamping the leaf image from the HELLO LADYBUG stamp set with full strength Garden Green ink. Then for the additional leaf images I stamped off on my grid paper (twice) before stamping on my Basic White background layer. TIP: Stampin' Pierce Mat is important for stamping this large solid photopolymer stamp. 

    Then I ran my stamped background through the BRICK & MORTAR 3D embossing folder.

    Next I used a Basic Black Stampin' Write marker to "flick" the tip of the brush end of the marker with the marker cap and add speckles of texture. 

    Lastly I added some of my favorite Black & White 1/4" (6.4 MM) Gingham Ribbon for even more texture. 


    Along with texture, I really like to add dimension to my elements. I used the LADYBUG BUILDER punch to punch out Basic Black cardstock bodies and Daffodil Delight, Pumpkin Pie & Real Red cardstock wings (after stamping the dots image in Tuxedo Momento Black ink). For my ladybug wings I "double-stacked" Black Mini Stampin' Dimensionals on the sides of the body of the Pumpkin Pie ladybug. and then put a dot of Multipurpose Liquid Glue where the center of the wings are attached. TIP: This gives the wings a lift that will stay lifted even after the card is placed in an envelope and flattens. (The wings just bounce back up)! 


    From this side view you can see that I only lifted the wings on one of the ladybugs and glued the wings of the other ladybugs directly to their black bodes. I used Black Stampin' Dimensionals to pop up each of the ladybugs. Mini (white) Stampin' Dimensionals were used under the sentiment "You can bug me any time," and the Foam Adhesive Strips were used between the Basic White background layer and the Basic Black accent layer. For the card base Basic White Thick cardstock was used. 

    One last look at my finished project:


    ~ ~ ~ ~ ~ ~

    Thanks for hopping along with this Crafty Collaborations Technique Tuesday Texture Blog Hop. Click on the "Next Blog" text above to go directly to the next great blog and see another fantastic project!

    Joy 🌷


    P.S. I LOVE comments. Don't forget to leave me one! (scroll down)


    Product List


    If you don't already have a Stampin' Up! Demonstrator, I would love to be yours! 


    Ready to order? Please use the April/May host code (or the current month host code in the right hand column). Use the direct link 
    here.

    If your order is $150 or more, be sure to delete my host code so that YOU get Stampin' Rewards (10% of your product subtotal in FREE items you choose). 

    Contact me via my website if you have any questions. 


    Want a discount on your Stampin' Up! paper crafting purchases? 

    A commission based on your sales?

    PLUS---now thru May 31st, 2022---get an additional $66.50 of new 2022-2024 In Color products added to your $125 of products of your choice.

    ALL for ONLY $99 + tax.

    WHAT A DEAL!!! Click here.

    Contact me for more info.


  • Shop my ONLINE STORE
  • Join my Paper Poets Team – Discount Shoppers, Hobbyists, Part Time & Full Time Stampin' Up! demonstrators 
  • See my class schedule
  • Socialize with me on Facebook
  • Email Me
  • "Subscribe" via the box in the sidebar to the right (towards the top) so that you don't miss a single post! 


    Have a comment? Please leave it below. 😃